ShopDreamUp AI ArtDreamUp

Deviation Actions


Description
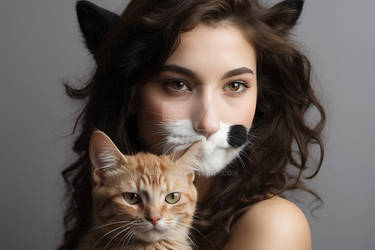
Here's another shot I took of my cousin Amanda and her beautiful cat Yanni. I was over her house taking a family portrait before everyone left again the next week and she really wanted Yanni in the photo, but by the time all the family was together, Yanni wasn't ready for his closeup, so we did without. Afterwards Amanda ran over behid the barn where Yanni had been sitting and snatched him so I could take a quick impromtu portrait of her with him and this was the result. this is my favorite photo of the whole evening. everything in it seems so natural. I love those kinds of shots. When I pose people, I always hate how it turns out. unless they are trained models it seems, they always stiffen right up when I try to pose them. So I've found the best method of shooting portraits is to just get a general idea of where you want to go and then give your subject loose direction as to what you want them to do. It's best if they have some kind of prop with them, (in this case, Yanni was more than a sufficient prop) or give them something to do. This could be anything from casting a fishing line into a pond, to just going for a walk. Something that they do often. If they play pool, get a shot of them playing pool. If they sit at home all day and play on te computer, get a shot of that. I dont know where I'm going with this so I'll stop here.
Composition:
well there wasn't much of a challenge here in the composition. I just applied a couple simple rules. I got in close so that there weren't any other distractions in the photo. doing this, I made sure the subject(s) were the main focus of the photo. Amanda and her cat.
It is flawed though. This is pretty common when capturing someones real expression. if I had taken the time to compose the shot correctly, she may have become uncomfortable and her natural smile would have slowly turned into a grimace. Because of this, I always try to shoot first & compose later, if that makes any sense. well onto the baddies. I should have tilted the camera up somewhat so's I didn't crop off one os Yanin's ears, and I should have panned it to te left so's I didn't crop off Yanni's paw. because if this, my eye strains to try and complete the photo with the cat's limbs not butchered up. Those are the main things that I can see wrong with it so far. there are proabbly other things that I am not seeing. meh.
I went in close with a 50mm lens (85mm equivalent) which is kinda on the verge of breaking the rules for this kind of portrait. if I had gone with a lens that was any wider her face would have started to distort and it would have gotten the famous "dog nose" effect. If you haven't heard of this before, try taking a photo of someone and filling the frame with their face with your widest lens. I enjoy that effect and often use it in some portraits, but it wasn't what I wanted for this shot.
I really like the way the two subjects are placed in the frame here. the eyes form a diagonal line in the photograph which, in my opinion, creates a little more dynamic and interesting photo than if they had been exactly side by side.
The expressions on both the cat and Amanda are priceless. to me, even if this photo is not completely perfect compositionwise, it is made one of my favorites because of the naturality amanda has presented. It could have been the perfect pose, where she looked her best, and had excelent posture and her head was tilted just so, but if she had a somewhat fake smile put on for the camera, the shot would be trash. Give me the realism man.
Photoshopness:
Alright let's see what happened to this.
First - I made a seperate "hue Saturation" adjustment layer which can be attained by clicking on that little circle that is half black & half white that resides in the layers palette. I pumped up the saturation in the photo and then I painted a mask onto amanda so she wouldn't be overly saturated. this was done by clicking on the little white box beside the adjustment layer and then painting on the image with my brush colour set to black.
Second - I took my healing brush tool and got rid of any little blemishes that everybody has when you zoom into their face at 100%.
Third - I duplicated my background layer and applied a "gaussian blur" filter with the radius set to about 16. I then adjusted the opacity to this layer to my liking so I could see the photo clearly, but it was just a tad softer. I then added a mask to this layer to make it invisible by holding down the option buttong on my mac (alt on a PC) and clicking the quickmask button found in the bottom of the layers pallette. this created a little box beside the layer that was filled with black colour. (black is the mask) I then switched my brush to white and painted the blur back onto amanda's face to soften her skin and make it all glamourous. (be careful to not overdo it on the blur or they'll look plastic.
Fourth - I created a new layer and when the new layer dialoge box appeared I set the layer's blend mode to overlay, and I clicked on the button to "fill overlay with 50% grey" I used this layer to do my dodging & burning. I dodged the eyes a little to make them pop. I did this by selecting my new 50% grey layer and then selecting a white brush set to about 10% opacity. I then painted inside the bottom right corner of the colour part of te eyes (iris? i'm dumb) I then switched my brush to black at 10% opacity and painted the thin dark circles around the iris' I then did some other dodging and burning as well.
Fifth - I flattened them image down once I had everything the way I wanted it.
Sixth - I duplicated that flattened layer and applied that same gaussian blur filter that I had applied before. it was at a radius of 16. I then set the blend mode of that layer to "soft light." I then dropped the opacity of the layer to my liking. ( I use this trick on almost every photo I put through photoshop. I even aply it to many landscape photographs. It gives them a more rich contrast & colour that I love love love.)
I think that's it for the digital darkroom side of things. I resized it & popped a little frame on for posterity (Smile)")
I think that's all I have to say about this photo. It is deffinately one of my alltime favorites. Lately I have not been impressed at all with the work I have been producing, this, even though flawed itself, gives me a little extra boost to go out and shoot some more instead of junking everything and selling off all my gear.
thanks for viewing.
Composition:
well there wasn't much of a challenge here in the composition. I just applied a couple simple rules. I got in close so that there weren't any other distractions in the photo. doing this, I made sure the subject(s) were the main focus of the photo. Amanda and her cat.
It is flawed though. This is pretty common when capturing someones real expression. if I had taken the time to compose the shot correctly, she may have become uncomfortable and her natural smile would have slowly turned into a grimace. Because of this, I always try to shoot first & compose later, if that makes any sense. well onto the baddies. I should have tilted the camera up somewhat so's I didn't crop off one os Yanin's ears, and I should have panned it to te left so's I didn't crop off Yanni's paw. because if this, my eye strains to try and complete the photo with the cat's limbs not butchered up. Those are the main things that I can see wrong with it so far. there are proabbly other things that I am not seeing. meh.
I went in close with a 50mm lens (85mm equivalent) which is kinda on the verge of breaking the rules for this kind of portrait. if I had gone with a lens that was any wider her face would have started to distort and it would have gotten the famous "dog nose" effect. If you haven't heard of this before, try taking a photo of someone and filling the frame with their face with your widest lens. I enjoy that effect and often use it in some portraits, but it wasn't what I wanted for this shot.
I really like the way the two subjects are placed in the frame here. the eyes form a diagonal line in the photograph which, in my opinion, creates a little more dynamic and interesting photo than if they had been exactly side by side.
The expressions on both the cat and Amanda are priceless. to me, even if this photo is not completely perfect compositionwise, it is made one of my favorites because of the naturality amanda has presented. It could have been the perfect pose, where she looked her best, and had excelent posture and her head was tilted just so, but if she had a somewhat fake smile put on for the camera, the shot would be trash. Give me the realism man.
Photoshopness:
Alright let's see what happened to this.
First - I made a seperate "hue Saturation" adjustment layer which can be attained by clicking on that little circle that is half black & half white that resides in the layers palette. I pumped up the saturation in the photo and then I painted a mask onto amanda so she wouldn't be overly saturated. this was done by clicking on the little white box beside the adjustment layer and then painting on the image with my brush colour set to black.
Second - I took my healing brush tool and got rid of any little blemishes that everybody has when you zoom into their face at 100%.
Third - I duplicated my background layer and applied a "gaussian blur" filter with the radius set to about 16. I then adjusted the opacity to this layer to my liking so I could see the photo clearly, but it was just a tad softer. I then added a mask to this layer to make it invisible by holding down the option buttong on my mac (alt on a PC) and clicking the quickmask button found in the bottom of the layers pallette. this created a little box beside the layer that was filled with black colour. (black is the mask) I then switched my brush to white and painted the blur back onto amanda's face to soften her skin and make it all glamourous. (be careful to not overdo it on the blur or they'll look plastic.
Fourth - I created a new layer and when the new layer dialoge box appeared I set the layer's blend mode to overlay, and I clicked on the button to "fill overlay with 50% grey" I used this layer to do my dodging & burning. I dodged the eyes a little to make them pop. I did this by selecting my new 50% grey layer and then selecting a white brush set to about 10% opacity. I then painted inside the bottom right corner of the colour part of te eyes (iris? i'm dumb) I then switched my brush to black at 10% opacity and painted the thin dark circles around the iris' I then did some other dodging and burning as well.
Fifth - I flattened them image down once I had everything the way I wanted it.
Sixth - I duplicated that flattened layer and applied that same gaussian blur filter that I had applied before. it was at a radius of 16. I then set the blend mode of that layer to "soft light." I then dropped the opacity of the layer to my liking. ( I use this trick on almost every photo I put through photoshop. I even aply it to many landscape photographs. It gives them a more rich contrast & colour that I love love love.)
I think that's it for the digital darkroom side of things. I resized it & popped a little frame on for posterity
I think that's all I have to say about this photo. It is deffinately one of my alltime favorites. Lately I have not been impressed at all with the work I have been producing, this, even though flawed itself, gives me a little extra boost to go out and shoot some more instead of junking everything and selling off all my gear.
thanks for viewing.
Image size
720x487px 280.21 KB
Make
Canon
Model
Canon EOS 20D
Shutter Speed
1/200 second
Aperture
F/3.5
Focal Length
50 mm
ISO Speed
400
Date Taken
Aug 3, 2006, 7:23:33 AM
© 2006 - 2024 ScottMoore
Comments0
Comments have been disabled for this deviation